A/C Pressure
5 min read
BP Automotive — A/C Setup Guide for LS/LT Swaps #
Purpose: Walk through choosing and integrating A/C parts with a BP Automotive standalone harness so you order the right pieces the first time.
Troubleshooting will be added in a later update.
Start here: how A/C works with a BP Automotive standalone harness #
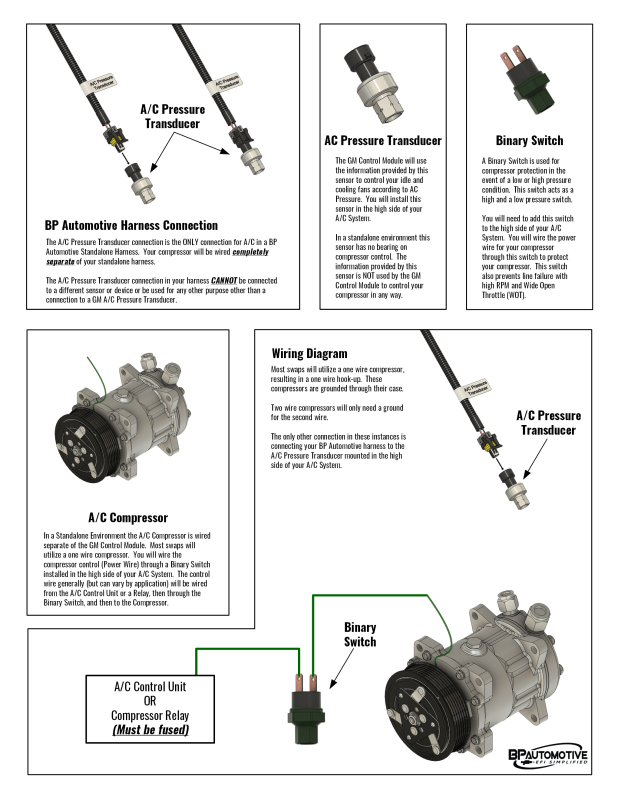
What this diagram is telling you:
- The GM A/C pressure transducer is the part that plugs into the BP Automotive standalone harness.
- That transducer is what the PCM uses to help control idle and cooling fans when A/C is in use.
- The transducer goes on the high side of the A/C system.
- In a standalone setup, the PCM does not run the compressor clutch from that transducer connection.
- The compressor is wired on a separate circuit (control unit or fused compressor relay → binary switch → compressor).
- Most swap compressors are one-wire (case-grounded). A two-wire compressor needs the second wire grounded.
- Use the harness A/C transducer connector only for a GM A/C pressure transducer — nothing else.
If you remember only one thing: transducer = PCM / fans / idle. Compressor = separate fused circuit with protection.
Step 1 — Determine the A/C system you have #
Before you order anything, write down what you are actually running. Most support tickets get stuck because this is missing.
Identify:
- Factory A/C retained (original dash/HVAC in the vehicle) or aftermarket (Vintage Air, Classic Auto Air, etc.)
- Compressor type: OEM GM-style vs aftermarket (for example Sanden) — and whether it is a one-wire or two-wire clutch
- Engine / PCM generation: Gen III, Gen IV, Gen V / LT, truck vs car OS
- Harness you have or are ordering (standalone vs plug-and-play direct-fit)
- Whether you already have a pressure transducer, binary / high-low switch, or neither
Quick forks we see often in tickets:
- Keeping factory truck/SUV A/C vs building a rod with aftermarket HVAC — parts and wiring paths differ
- “Does my harness include A/C?” — standalone harnesses typically include the transducer connection for the PCM; they are not a full HVAC control harness
- Plug-and-play vehicle harnesses may have different A/C options at checkout (for example A/C update kits on certain trucks)
Step 2 — Look through our A/C parts page #
Browse the full A/C category so you see sensors, fittings, binary switches, and kits in one place:
Related items customers often need alongside A/C (fans, pigtails, extensions) live in other categories on the site — but start on that A/C page for transducer and binary-switch hardware.
Step 3 — Determine which transducer fitting (or fittings) will work for your system #
You need a way to mount a GM A/C pressure transducer on the high side of your A/C system. BP Automotive sells the sensor and several fitting styles so you can match how your lines / drier / barrier hose are built.
On each product page: scroll down and read the full description. That is where installation and technical details live (thread sizes, what the fitting is for, what it is not for, and which kits include the sensor vs fitting only).
Examples of what you will see on the A/C page (confirm current options on the site):
- GM A/C Pressure Sensor (transducer)
- Sensor + weld-in fitting kits
- Weld-in fitting with metric port (fitting only)
- Thread-in fittings (for example 3/8 × 24 with metric port)
- #8 standard barrier crimp-in fittings (with sensor, with metric port, or with binary-switch port styles)
- Receiver drier assemblies that include a GM transducer
- T-in fittings for certain LS-swap layouts
Read every candidate listing before you buy. Fitting choice is the #1 ordering mistake we see in A/C tickets (wrong port, wrong thread, sensor-only when a fitting was needed, or binary-switch fitting ordered when a transducer fitting was needed).
Step 4 — Decide where you will mount the transducer, then pick the exact fitting #
The transducer belongs on the high side. Where you can physically put it (drier, barrier hose, hard line, T-fitting, etc.) decides which fitting you actually need.
Do this in order:
- List the fittings from Step 3 that physically match your system (thread / crimp / weld / T).
- Pick the mount location you can access and that stays on the high side.
- Narrow to the one fitting (or kit) that matches that location.
- Order the GM transducer if your kit does not already include it.
Tip from real tickets: take a clear photo of your high-side port / drier / hose end before you order. If you email us, include that photo plus your harness order number — it cuts a lot of wrong-part back-and-forth.
Step 5 — Determine if your system already has compressor protection #
The compressor needs high and/or low pressure protection. On many factory A/C systems that protection already exists (binary, high-pressure, low-pressure, or a combination).
Ask:
- Does my factory (or aftermarket HVAC) system already have a high and/or low pressure switch in the compressor control path?
- Or am I building a system that only has (or will only have) the GM pressure transducer for the PCM?
Important distinction (from the overview diagram):
- The GM pressure transducer on the BP harness is for PCM idle / fan control.
- In a standalone setup it is not your compressor high/low cutout.
- If you do not already have compressor protection, you need to integrate a binary switch (or equivalent high/low protection) in the compressor power circuit.
Step 6 — If you need a binary switch, pick the fitting from the same A/C page #
Use the same category:
Look for binary switch options and the fittings that let you install them (for example M10 or 7/16 binary switches, and matching crimp-in / port fittings). Again: open each product and read the description — binary-switch notes call out what the switch does and does not do (for example, a binary switch may protect the compressor without turning fans on by itself; fan behavior still depends on the transducer + PCM programming).
Wire path reminder (overview diagram):
A/C control unit OR fused compressor relay → binary switch → A/C compressor
Do not leave the compressor on an unprotected constant feed.
Step 7 — Confirm your ECU is programmed for pressure-transducer fan control #
The transducer only helps idle and fans if the calibration expects it.
BP Automotive policy:
- If BP Automotive tuned your ECU, it is programmed for the transducer.
- We always program the ECU for the transducer when we do the tune.
If someone else tuned the ECU:
- Confirm with that tuner that A/C pressure transducer / A/C fan control tables are enabled for your OS.
Gen IV Truck/SUV note (important):
- Some Gen IV Truck/SUV operating systems will not properly control your fans with A/C, even with the hardware installed. If you are on one of those OS families, plan for that limitation up front (fan strategy / OS choice) rather than assuming the transducer alone will fix fan behavior with A/C on.
Pre-order checklist (saves everyone time) #
Before you hit checkout or email support, have these answers ready:
- Factory HVAC retained or aftermarket brand
- Harness type / order number (or the harness you plan to buy)
- Engine + PCM generation (Gen III / IV / V, truck vs car)
- Do you already have a GM pressure transducer? Binary / high-low switch?
- Where you plan to mount the transducer on the high side
- Who is tuning the ECU (BP Automotive or another tuner)